All about Windows Generic Product Keys 

Microsoft Windows Generic Product Keys are also called default keys, which allow you to install a specific Windows OS without needing your licensed product key. A good example is when you are replacing a motherboard or installing a VM. Please be advised that you can use such keys to install the OS, but not for activation.

Windows 11 Edition        Generic Key

Windows 11 Home          YTMG3-N6DKC-DKB77-7M9GH-8HVX7

Windows 11 Home N      4CPRK-NM3K3-X6XXQ-RXX86-WXCHW

Windows 11 Home Home Single Language            BT79Q-G7N6G-PGBYW-4YWX6-6F4BT

Windows 11 Home Country Specific         N2434-X9D7W-8PF6X-8DV9T-8TYMD

Windows 11 Pro               VK7JG-NPHTM-C97JM-9MPGT-3V66T

Windows 11 Pro N           2B87N-8KFHP-DKV6R-Y2C8J-PKCKT

Windows 11 Pro for Workstations             DXG7C-N36C4-C4HTG-X4T3X-2YV77

Windows 11 Pro for Workstations N         WYPNQ-8C467-V2W6J-TX4WX-WT2RQ

Windows 11 Pro Education          8PTT6-RNW4C-6V7J2-C2D3X-MHBPB

Windows 11 Pro Education N      GJTYN-HDMQY-FRR76-HVGC7-QPF8P

Windows 11 Education  YNMGQ-8RYV3-4PGQ3-C8XTP-7CFBY

Windows 11 Education N              84NGF-MHBT6-FXBX8-QWJK7-DRR8H

Windows 11 Enterprise  XGVPP-NMH47-7TTHJ-W3FW7-8HV2C

Windows 11 Enterprise N             WGGHN-J84D6-QYCPR-T7PJ7-X766F

Windows 11 Enterprise G N         FW7NV-4T673-HF4VX-9X4MM-B4H4T

Additionally, there are also product keys for KMS clients. If your OS is supposed to work with a KMS server, you must install the appropriate product key (GVLK) instead of the retail one. The keys are as follows.

KMS Client Product Keys for Windows 11

Windows 11 Edition        KMS Client Key

Windows 11 Home          TX9XD-98N7V-6WMQ6-BX7FG-H8Q99

Windows 11 Home N      3KHY7-WNT83-DGQKR-F7HPR-844BM

Windows 11 Home Home Single Language            7HNRX-D7KGG-3K4RQ-4WPJ4-YTDFH

Windows 11 Home Country Specific         PVMJN-6DFY6-9CCP6-7BKTT-D3WVR

Windows 11 Pro               W269N-WFGWX-YVC9B-4J6C9-T83GX

Windows 11 Pro N           MH37W-N47XK-V7XM9-C7227-GCQG9

Windows 11 Pro for Workstations             NRG8B-VKK3Q-CXVCJ-9G2XF-6Q84J

Windows 11 Pro for Workstations N         9FNHH-K3HBT-3W4TD-6383H-6XYWF

Windows 11 Pro Education          6TP4R-GNPTD-KYYHQ-7B7DP-J447Y

Windows 11 Pro Education N      YVWGF-BXNMC-HTQYQ-CPQ99-66QFC

Windows 11 Education  NW6C2-QMPVW-D7KKK-3GKT6-VCFB2

Windows 11 Education N              2WH4N-8QGBV-H22JP-CT43Q-MDWWJ

Windows 11 Enterprise  NPPR9-FWDCX-D2C8J-H872K-2YT43

Windows 11 Enterprise N             DPH2V-TTNVB-4X9Q3-TJR4H-KHJW4

Windows 11 Enterprise G              YYVX9-NTFWV-6MDM3-9PT4T-4M68B

Windows 11 Enterprise G N         44RPN-FTY23-9VTTB-MP9BX-T84FV

Windows 11 Enterprise LTSC 2019            M7XTQ-FN8P6-TTKYV-9D4CC-J462D Windows 11 Enterprise N LTSC 2019        92NFX-8DJQP-P6BBQ-THF9C-7CG2H

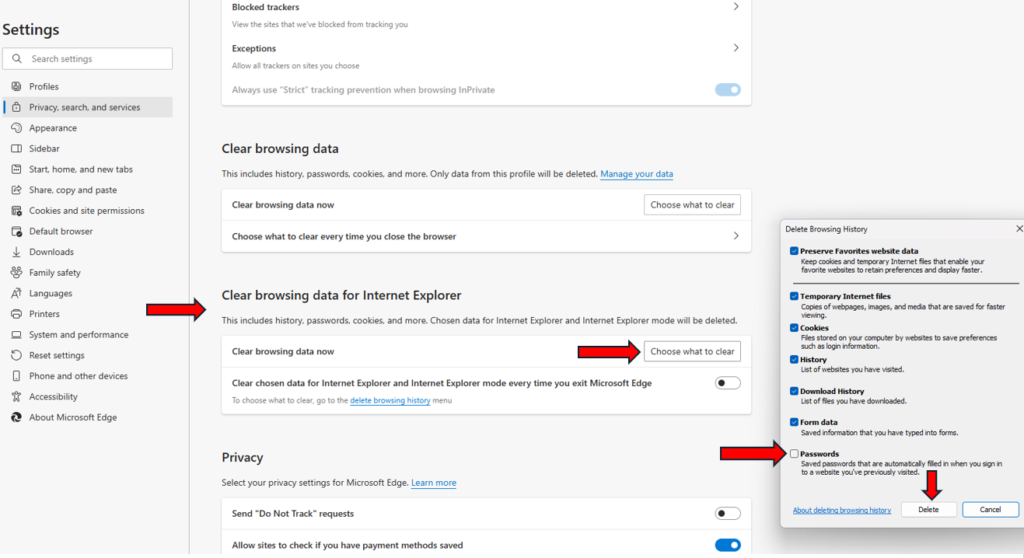
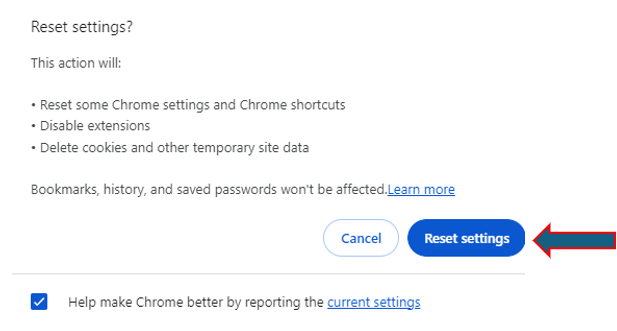
Once you have installed Windows 11 with a generic product key, you may need to replace the installed product key with the one that allows activation, e.g. with your retail key. If you have a digital license linked to your Microsoft Account, the operating system will automatically use a generic key after you login your Microsoft account.

For Windows 10

Windows 10 Pro               W269N-WFGWX-YVC9B-4J6C9-T83GX

Windows 10 Pro N           MH37W-N47XK-V7XM9-C7227-GCQG9

Windows 10 Home – YTMG3-N6DKC-DKB77-7M9GH-8HVX7

For Server

Windows Server v1809

Operating system edition              KMS Client Setup Key

Windows Server Datacenter         6NMRW-2C8FM-D24W7-TQWMY-CWH2D

Windows Server Standard            N2KJX-J94YW-TQVFB-DG9YT-724CC

Windows Server v1803

Operating system edition              KMS Client Setup Key

Windows Server Datacenter         2HXDN-KRXHB-GPYC7-YCKFJ-7FVDG

Windows Server Standard            PTXN8-JFHJM-4WC78-MPCBR-9W4KR

Windows Server v1709

Operating system edition              KMS Client Setup Key

Windows Server Datacenter         6Y6KB-N82V8-D8CQV-23MJW-BWTG6

Windows Server Standard            DPCNP-XQFKJ-BJF7R-FRC8D-GF6G4

Product keys for Windows Server LTSC/LTSB versions

Windows Server 2019

Operating system edition              KMS Client Setup Key

Windows Server 2019 Datacenter             WMDGN-G9PQG-XVVXX-R3X43-63DFG

Windows Server 2019 Standard N69G4-B89J2-4G8F4-WWYCC-J464C

Windows Server 2019 Essentials WVDHN-86M7X-466P6-VHXV7-YY726

Windows Server 2016

Operating system edition              KMS Client Setup Key

Windows Server 2016 Datacenter             CB7KF-BWN84-R7R2Y-793K2-8XDDG

Windows Server 2016 Standard WC2BQ-8NRM3-FDDYY-2BFGV-KHKQY

Windows Server 2016 Essentials JCKRF-N37P4-C2D82-9YXRT-4M63B

Please view this YouTube:

How to create videos using Clipchamp

Creating videos in Clipchamp is a straightforward process. Here’s a step-by-step guide to help you get started:

Option 1: Create a New Project

  1. Start a New Project: Once logged in, click on “Create a video” or “Start a new project.”
  1. Select Aspect Ratio: Choose the 16:9 aspect ratio for YouTube videos.

Option 2: Import Media

  1. Upload Files: Click on the “Add Media” button to upload your video files, images, and audio clips from your computer. You can also drag and drop files directly into the media library.
  1. Stock Media: You can also use Clipchamp’s stock media library for additional footage, images, and music.

Option 3: Create a video with AI

How to Edit Your Video

  1. Drag to Timeline: Drag your media files to the timeline at the bottom of the screen.
  1. Trim and Split: Use the trimming and splitting tools to cut out any unwanted parts of your video.
  2. Add Text and Titles: Click on the “Text” option to add titles, captions, and other text elements to your video.
  3. Transitions and Effects: Apply transitions between clips and add effects to enhance your video. Clipchamp offers a variety of transitions and filters.
  4. Audio: Add background music or voiceovers. Adjust the volume levels to ensure the audio is balanced.

Add Finishing Touches

  1. Review: Watch your video from start to finish to ensure everything looks and sounds good.
  2. Adjustments: Make any final adjustments to the clips, text, and audio.

Export Your Video

  1. Export: Once you’re happy with your video, click the “Export” button.
  2. Choose Quality: Select the video resolution (1080p is recommended for YouTube).
  3. Export and Save: Click “Export” to start the rendering process. Once done, save the video file to your computer.

Upload to YouTube

  1. Go to YouTube: Visit YouTube and log in to your account.
  2. Upload Video: Click on the camera icon with a plus sign (upload) and select your exported video file.
  3. Fill Details: Enter the title, description, tags, and choose a thumbnail for your video.
  4. Publish: Once everything is set, click “Publish” to upload your video to your YouTube channel.

Tips for a Great YouTube Video

  • Engaging Content: Make sure your content is interesting and engaging for your audience.
  • Good Lighting: Ensure your videos are well-lit.
  • Clear Audio: Use a good microphone for clear audio.
  • Consistent Branding: Use consistent colors, fonts, and styles to establish your brand.

Please view this video for step by step instruction:

Fixing HP Hard disk 3F0 boot device not found error

If the Hard Disk Error 3F0 boot device not found is displayed on a black screen, use the following procedures to try to resolve the error.

Resolution 1: Perform Hard Reset

  • Turn off your PC and remove the AC adapter from it.
  • Make sure there is no peripheral device connected now to your PC.
  • After that, press the Power button for about 15 seconds to drain out the residual charge.
  • Now, press the Power button again to reboot your system.
  • Once the Startup menu appears, use arrow keys to navigate to Start Windows Normally and hit Enter.
  • Connect all the needed devices and see if the error is resolved.

Resolution 2: Reset Your Hard Drive

You can try resetting the hard drive to fix the error. To do so, follow the given steps:

  • Turn off your PC by pressing the Power button and unplug the power cable.
  • Now, disconnect the hard drive and reconnect again.
  • Reboot your PC to check if it works seamlessly without showing any error.

Resolution 3: Restore BIOS default settings

  1. Turn off the computer and wait five seconds.
  2. Press the power button to start the computer and repeatedly press the f10 key to enter the BIOS setup menu.
  3. On the BIOS Setup screen, press f9 to select and load the BIOS Setup Default settings.
  4. Press f10 to Save and Exit.
  5. Use the arrow keys to select Yes, and then press Enter when asked Exit Saving Changes?
  6. Follow the prompts to restart your computer.

Resolution 4: Boot PC with Bootable Media and Rebuild MBR

If you’re having trouble booting your PC normally, boot your PC with bootable media and then rebuild the MBR (Master Boot Record). Here are the steps:

  • Create installation media for Windows and boot your PC using the media.
  • Next, select the language and other preferences and click ‘Next on the initial setup screen.
  • Next, click Repair your computer.
  • On Automatic Repair environment, click Advanced options.
  • Then follow Troubleshoot > Advanced options > Command Prompt.
  • In the Command Prompt window, type the following commands and press Enter.

BOOTREC /FIXMBR

BOOTREC /FIXBOOT

BOOTREC /rebuildbcd

  • Once the process is complete, close the window.
  • Reboot your system and check if it’s working fine.

Resolution 5: Reset your PC

If none of the above methods work, you’ll be left with only one option – resetting your PC. To do so, restart your PC with bootable installation media and follow the given steps:

  • Enter Automatic Repair environment and click Advanced options.
  • On the Choose an Option screen, click Troubleshoot.
  • Next, click Reset this PC.

  • Now, choose an option – Keep my files or Remove everything.

Note: To make this method work, it is recommended to choose Remove everything.

On the next prompt, click Just remove your files and then click Next.

A warning message will appear. Click Next > Reset.

  • When prompted, click Continue.
  • Once the process is finished, close the window and reboot your system.

Resetting your PC with the ‘Remove everything’ option will cause data loss. However, you can use a powerful data recovery software, such as Stellar Data Recovery Professional to recover the data after resetting your Windows PC. It is a DIY tool that efficiently restores any data from all types of storage devices.

Resolution 6: Run CHKDSK Command to Fix Bad Sectors on Hard Drive

Bad sectors on the hard drive may occur due to corruption, physical damage to the drive, etc. You can try running the CHKDSK command to fix the corruption and bad sectors on the hard drive. Follow the given steps:

  • Type Command Prompt in Windows Search Box and run it as an administrator.
  • In the Command Prompt Window, type CHKDSK /f/r/D: and press Enter. (Replace D: with your hard drive letter.
  • Wait for a while. Once done, close the Command Prompt window and check if the problem is solved.

Caution: The CHKDSK command with the F and R attribute can fix the corrupted hard drive. However, this command scans and marks down the bad sectors on the hard drive and prevents Windows from reading and storing data on these bad sectors, eventually causing data loss.

Resolution 7: Perform the hard drive symptom test in HP PC Hardware Diagnostics UEFI

When Windows won’t start, use the following instructions to open the Symptom Tests menu, and then run the hard drive test.

  1. Hold the power button for at least five seconds to turn off the computer.
  2. Turn on the computer and immediately press esc repeatedly, about once every second. When the menu is displayed, press the f2 key.
  3. On the main menu, click Symptom Tests.

The Symptom Tests menu is displayed.

Your Symptom Tests menu might be different, depending on the components installed on your computer.

  1. Select Hard disk/SSD drive issue, and then press enter.
  2. If the computer has more than one hard drive, select the drive to test. To test all the hard drives, select Test All Hard Drives.

NOTE: 

If the test does not find a hard drive, try reinstalling Windows using the steps in Reinstall Windows on the hard drive.

When the test is complete, the screen displays the results. Test results are also available in the Test Logs on the main menu.

  1. If the hard drive passes the Quick Test, but there is still a problem with the hard drive, run the Extensive Test. This test includes the SMART Check, Short DST, Optimized DST, and Long DST. To run these tests individually, select them from the Hard Drive Tests menu.
  2. If the hard drive fails a test, click Troubleshoot.
  3. Follow the on-screen instructions to attempt to resolve the problem, and then click Yes.
  4. If the problem is not resolved, click Yes to contact HP Customer Support.
  5. Write down or copy the failure ID (24-digit code) and product ID for when you contact HP Customer Support. You can also use your mobile device to take a photo of this information or to scan the displayed QR code. The information is also available in Test Logs on the main menu.
  6. If your computer is online, click NEXT to go to the HP Customer Support website.

Resolution 8: Update the BIOS, please follow the manufactory instructions.

Please view this step by step video:

How to use Snapping tool to record Windows activity

  1. Snipping Tool recording requires Windows 11
    • In Windows 11, search for “Snipping Tool” in the Start menu search box and open it.
  2. Start Recording:
    • In the top toolbar, click the Record button.
    • Click New to create a rectangle, selecting the portion of the screen you want to record.
  3. Begin Recording:
    • Press Start.
    • You’ll see a 3-second countdown before recording begins.
  4. Stop Recording:
    • After you finish recording, press Stop.
    • Your recording can be copied to memory, shared via the Share dialog, or saved (by default, it’s saved in the Videos folder).

Please view this step by step video:

How to fix Virus warning popup

Situation: You’re browsing online, and suddenly a pop-up appears on your screen, indicating your device has a virus and prompts you to download a software to remove it.

If you’re dealing with virus alerts that keep popping up, here are some steps you can take to get rid of them:

1. Restart your computer

In a case you have clicked the alert download or scan link, the first step is to restart your computer. This should help you get rid of installing the virus.

2. Scan Your Computer

Even if you believe your system is clean, it’s a good idea to run a deep antivirus scan. To run Windows defense, please follow these steps: 1) Type Windows security in the search bar, open Windows security

2) Click on Virus & protection.

3) Click Scan options, select the option you prefer, for example Full scan. Then Scan now.

4) Follow the instruction to complete the scan.

3. Reset Browser Settings

If the pop-ups persist, consider resetting your browser settings to delete cookies, modify the Notification and restore the default state, which can help remove any suspicious extensions or settings that might be causing the alerts.

For Microsoft Edge

  • Click 3 dots and then Settings.
  • Click Privacy, search, and services and then click Choose what to clear under Clear browsing data.
  • You have 4 options: Browsing history, Download history, Cookie and other site data and Caching images and files. Click Clear now to clear browsing data.
  • Do the same in Clear browsing data for Internet Explorer. Note: You may not want to clear Passwords.
  • Click Reset settings in the left pane, and explorer Restore settings to their default values. Click Reset.

For Google Chrome

  • Click on 3 dots in Google Chrome and then Settings.
  • Click Privacy and security and then Clear browsing data.
  • Check whatever you want to clear and click on Clear data.

Note: If you click on Advanced, you may have more options.

  • You can also modify Security.
  • This is example settings.
  • Click on Reset settings and then Restore settings to their original default.
  • Click on Reset settings to reset Chrome to original settings.

4. Remove pop-ups from Extensions

For Microsoft edge

  • Click 3 dots on the top right and then Extensions.
  • Or click on Extensions icon.
  • Click on manage extensions.

  • You will have options to enable each extension, check the Details and Remove it.

For Google Chrome

  • Click 3 dots and click on Extensions.
  • Or click on Extensions icon on the top right.
  • Click on Manage extensions.
  • You will have options to enable each extension, check the Details and Remove it.

5. Configure Notifications

  • Go to Edge Settings and click on Cookies and site permissions. Click on Notifications.
  • You can configure Notification here.

For Chrome

  • Got to Settings and click Privacy and security Site Settings. Then Site settings.

  • Click Notifications.
  • You can manage the Notification here..

6. Block pop-ups in Microsoft Edge

For Microsoft Edge

  • In Edge, go to Settings > Cookies and site permissions > Pop-ups and redirects. Manage the Block settings here.

For Chrome, go to Settings > Privacy and security > Pop-ups and redirects. Manage the Block settings here.

Please view this step by step video:

How to clear the cache in Microsoft Teams

Situation: If Microsoft Teams fails to launch, crashes frequently, or has trouble loading stuff, or shows incorrect information, you might be dealing with a corrupt application or web cache. This tutorial will show you how to delete cached data from the Teams app and the browser-based web app.

Resolution: Delete Microsoft Teams Cache via Settings App

Note: please close the Teams first.

  1. Open the Settings by click Start icon

and then click on Settings.

  1. Click on Apps in the left pane

3. Click on Installed apps.

4. Scroll down and locate Microsoft Teams. Then, select the More (three dots) icon next to and choose Advanced options.

5. Scroll down to the Reset section and select Reset.

6. Restart the Teams and try it.

How to change the visual in Pictory AI

Pictory AI fetches visuals based on the keywords in your text. To change the visuals on a scene, please follow the below:

  • Open the project and select the scene to change the visual for.
  • Go to Visuals > Library.
  • Click on the visual you wish to use for the scene.
  • ​You will see the visual applied to the scene on the right of the screen​
  • You also have the option to upload your own visuals, under My uploads. Just upload your visuals and select them to be applied to the scene.