How to Install and Configure Windows, VMware, Virtualization and Cisco on
Author: Bob Lin
Bob Lin, Chicagotech-MVP, MCSE & CNE
Data recovery, Windows OS Recovery, Networking, and Computer Troubleshooting on
http://www.ChicagoTech.net
How to Install and Configure Windows, VMware, Virtualization and Cisco on
http://www.HowToNetworking.com
Organizing iPhone apps into groups (folders) is simple and helps keep your home screen tidy. Here’s how you can do it:
Create a Folder Press and hold any app until all apps jiggle (or tap Edit Home Screen). Drag one app on top of another that you want in the same group. A folder will be automatically created with a suggested name.
Use the App Library: Swipe left on your Home Screen until you reach the App Library. Apps are automatically sorted into categories like “Social” or “Utilities.” You can use this to find and organize apps.
Rename the Folder: Tap on the folder to open it. Tap the name field and type in a new name, for example, Google apps. Press Done on the keyboard.
Add More Apps to the Folder: While apps are still jiggling, drag additional apps into the folder.
Move or Remove Apps: To remove an app from the folder, drag it out to the home screen. To delete a folder, remove all apps from it, and it will disappear.
Marking your parking spot in Google Maps is a handy feature to ensure you never lose track of where you parked. Here’s how you can do it:
Open Google Maps: Launch the app on your smartphone.
Set Your Location: Once you’ve parked, tap the blue dot that represents your current location.
Save Your Parking Spot: A menu will appear. Tap “Save parking.” This will mark the spot on the map with a “P” icon.
Add Details (Optional): You can add notes (e.g., “Level 3, near elevator”) or even photos to help you remember the exact location.
Access Your Parking Spot: When you’re ready to return, open Google Maps and tap on the “P” icon or search for “Saved Parking” to navigate back.
To remove the “P” icon (saved parking location) from Google Maps, follow these steps:
Open Google Maps: Launch the app on your smartphone.
Tap the “P” Icon: Locate the “P” icon on the map, which marks your saved parking spot.
Clear the Parking Location: Tap on the “P” icon, and a menu will appear. Select “Clear” or “Remove parking location” (the exact wording may vary depending on your app version).
Did you know that Microsoft home users can get free technical support? This video gives two examples to explains how to contact Microsoft technical support and open a case.
To get support for Microsoft home users, you can visit the Microsoft 365 Family Support page or the Microsoft 365 Customer Service and Support page by searching Microsoft 365 Customer Service and Support.
Enter the problem you may have, for example, OneDrive shared folder shortcuts that appear as Internet shortcuts. Select OS version, for example Windows 11. Click on Sign in to contact Support. Sign in with your Microsoft account to access personalized support.
Select the product, for example, Microsoft 365 and office. Select Category, Technical Support. Then click on Confirm. Click on OneDrive app support. You can email your question to Microsoft support. You will receive an email from Microsoft Support with Case number.
Example 2: Open a Microsoft Windows issue and chat or talk with Microsoft support agent.
In Contact Microsoft Support page, enter the problem, for example Windows update.
Choose Windows OS version, Windows 11.
Click Contact Support.
Select product or service. Then Confirm.
You will have options to Chat with agent or call back.
If you click Chat with a support agent and confirm, you will receive a request number and someone from Microsoft will contact by email.
If you click provide your phone number and a support agent will call you. Enter your phone number. And click confirm. Microsoft agent will call you later.
To enable or disable Microsoft 365 Authenticator for a user, follow these steps:
Sign in as an Administrator: Log in to the Microsoft 365 Admin Center with your admin account.
Navigate to Users: Go to “Users” and then “Active Users.”
Multi-Factor Authentication: Click on “Multi-Factor Authentication” under the “More” options.
4. Manage User Settings: Select the user(s) you want to enable or disable the Authenticator for. You will see options to enable, disable, or enforce multi-factor authentication (MFA). You may receive “Enable multifactor authentication popup. Just click Enable.
5. Save Changes: Make the necessary changes and save them.
You can also use Azure to enable or disable MFA.
Go to Users: In the Azure Active Directory, select “Users” and then “All Users.”
Search the user.
Click on the user.
Click on Authentication methods.
Click on Revoke multifactor authentication sessions to disable it.
Click on Add authentication method to setup MFA.
Click on Require re-register multifactor authentication.
If the ‘Disable MFA’ or ‘Revoke multifactor authentication sessions’ options are grayed out, it indicates that your company enforces a policy requiring all users to have multi-factor authentication (MFA) enabled.
To find the policy, go to Microsoft Entra admin center> Security Center, Conditional Access,
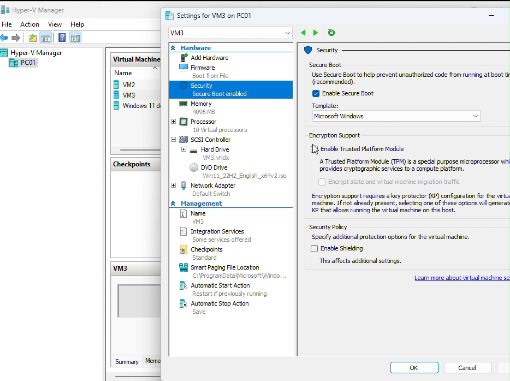
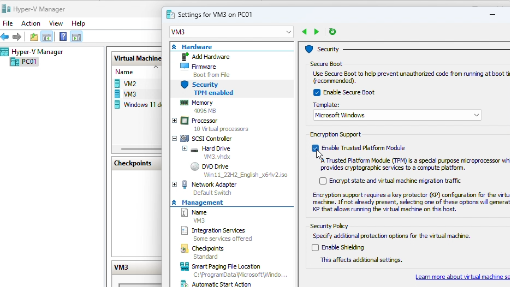
If the Virtual Machine doesn’t support Secure Boot, you can go to VM Settings, Security to enable it.
If you don’t see the Secure Boot in Security, that is because the Secure Boot is supported only on Generation 2 virtual machines.
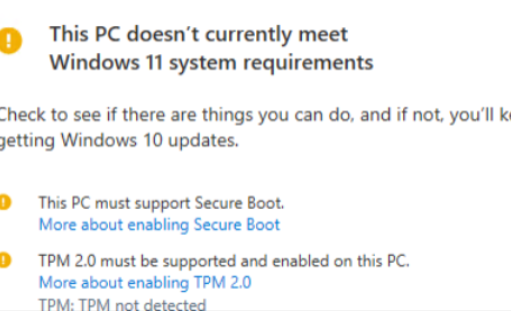
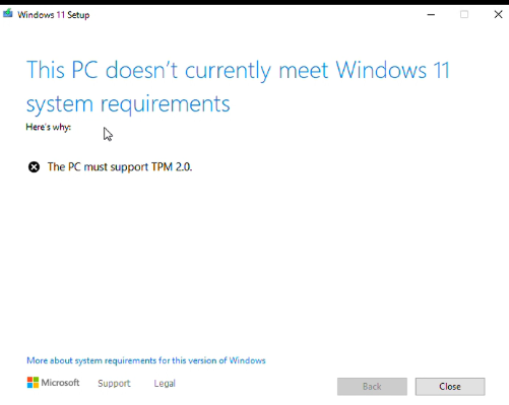
If you receive a message: This PC doesn’t currently meet Windows 11 system requirements, and The PC must support TPM 2.0, you can enable TPM by going to VM Settings, Security,
Windows 10 will reach the end of support on October 14, 2025. After this date, Microsoft will no longer release free security updates, bug fixes, or provide technical support for the operating system. In this video, we will guide you through the process of upgrading from Windows 10 to Windows 11.
Check System Requirements: Ensure your PC meets the minimum requirements for Windows 11. You can use Microsoft’s PC Health Check tool to verify compatibility.
Backup Your Files: Create a backup of all your important files to avoid any data loss during the upgrade process. Type Windows backup in the search bar. Open Windows backup. Use an external hard drive or cloud storage.
Run Windows Updates
1) Open Windows Update: Go to Settings > Update & Security > Windows Update.
Check for Updates: Click on “Check for updates.” If your PC is compatible, the option to upgrade to Windows 11 should appear.
3) Download and Install: Select the Windows 11 update and click “Download and install.” Follow the on-screen instructions.
Restart Your PC: Once the installation is complete, restart your PC when prompted. Your system may reboot several times during the process.
Set Up Windows 11: After the final restart, you’ll be guided through the initial setup for Windows 11.
If your PC is running an older version of Windows 10, you may not be able to upgrade it to Windows 11. In this case, you need to update to the latest version of Windows 10 first.
Another possible reason you can’t upgrade to Windows 11 is that your PC’s current settings do not enable TPM 2.0. If your PC is equipped with TPM 2.0, you may need to access the BIOS and enable it.
We also provide a list of other possible reasons why your PC may not upgrade to Windows 11.
1. Hardware Incompatibility: Windows 11 has specific hardware requirements, such as:
o A compatible processor (Intel 8th Gen/AMD Zen 2 or newer).
o Secure Boot capability.
o At least 4GB of RAM and 64GB of storage.
2. Outdated BIOS/UEFI: If your motherboard’s firmware is outdated, it might not support features like Secure Boot or TPM 2.0 or older CPUs.
3. Unsupported Graphics Card: Windows 11 requires a graphics card compatible with DirectX 12 or later.
4. Registry or Group Policy Blocking Upgrade: Some organizations or users manually block Windows 11 upgrades via **Group Policy** or **Registry edits**.
If the Windows Update check doesn’t offer the option to upgrade to Windows 11, you can manually upgrade by downloading the Windows 11 ISO file and installing it.
You may wonder how to switch Microsoft accounts if you have two—one for business and another for personal use. This video demonstrates how to manage multiple Microsoft accounts in Microsoft Edge and switch between different profiles. Each profile is linked to a separate account, allowing you to keep your browsing data and settings distinct.
Here’s how:
Launch Microsoft Edge and login one of your Microsoft accounts.
Click 3 dots and then Settings.
Click “+ Add profile” and then “Add”.
Sign in to the Microsoft account you want to associate with the new profile. Choose whether to sync data (like bookmarks, extensions, etc.) across devices for this profile.
If you have an issue with Microsoft products, you may contact Microsoft Live Chat Support directly for help by following the steps below. You can use any personal Microsoft account that you may have signed in to, or you can create a new account to contact support and report your problem account.
If you’re experiencing issues with OneDrive and a standard re-installation hasn’t resolved the problem, you may need to completely uninstall OneDrive and remove any residual files or settings. Here’s how to do it:
Step 1: Uninstall OneDrive via Settings
Press Windows + I to open Settings.
Go to Apps > Installed Apps (or Apps & Features).
Scroll down and find Microsoft OneDrive.
Click the three dots (…) next to OneDrive and select Uninstall.
Follow the prompts to complete the uninstallation.
Step 2: Unlink OneDrive from this PC
· If the OneDrive icon still appears in the system tray, open it.
· Click on Settings.
· Navigate to the Account tab and select Unlink this PC.
· If OneDrive still appears after completing these steps, restart your computer and check again.
Step 3: Delete Residual OneDrive Files and Folders
Press Windows + R, type %localappdata%, and press Enter.
Locate and delete the Microsoft folder (or just the OneDrive folder inside it).
Go back to the %localappdata% folder, then navigate to the Temp folder and delete any OneDrive-related files.
Press Windows + R, type %appdata%, and press Enter.
Delete the Microsoft folder (or just the OneDrive folder inside it).
Step 4: Remove OneDrive from the Registry (Advanced)
Warning: Editing the registry can cause system issues if done incorrectly. Proceed with caution and back up your registry before making changes.
Press Windows + R, type regedit, and press Enter.
Navigate to the following keys and delete any OneDrive-related entries:
HKEY_CURRENT_USER\Software\Microsoft\Windows\CurrentVersion\Run (look for a OneDrive entry).
HKEY_LOCAL_MACHINE\SOFTWARE\Microsoft\Windows\CurrentVersion\Run (look for a OneDrive entry).
HKEY_CLASSES_ROOT\CLSID (search for “OneDrive” and delete related keys).
Close the Registry Editor.
Step 5: Restart Your Computer
After completing the steps above, restart your computer to ensure all changes take effect.
Step 6: Reinstall OneDrive (Optional)
If you want to reinstall OneDrive after a clean removal: