- Migration Manager. Copy file shares or content from other cloud providers to Microsoft 365. Learn more about migrating content to Microsoft 365.
- SharePoint Migration Tool. To migrate SharePoint Server sites and content, you can use the SharePoint Migration Tool. For info, see Overview of the SharePoint Migration Tool.
- Known Folder Move. If your users save most of their files to their Desktop, Documents, and Pictures folders, you can seamlessly move them to OneDrive using Known Folder Move so users can continue working in the locations they’re used to.
- FastTrack migration benefit. FastTrack provides you with a set of best practices, tools, resources, and experts. Guidance includes migrating content from file shares, Box, or Google Drive source environments, and introducing capabilities at the pace that works for you. The FastTrack data migration benefit will also perform specific data migration activities on your behalf if you have 500 or more licenses. See more details in the FastTrack Center Benefit Overview. To get started, go to FastTrack.Microsoft.Com, review resources, and submit a request for assistance.
Author: Bob Lin
Bob Lin, Chicagotech-MVP, MCSE & CNE
Data recovery, Windows OS Recovery, Networking, and Computer Troubleshooting on
http://www.ChicagoTech.net
How to Install and Configure Windows, VMware, Virtualization and Cisco on
http://www.HowToNetworking.com
Share Files in Microsoft 365 using OneDrive, Teams and SharePoint
Comparison: Teams vs. SharePoint vs. OneDrive
| Main Use | Advantages | Disadvantages | |
|---|---|---|---|
| Microsoft Teams | Ongoing communication | Fast, low effort | Lack of transparency, oversight |
| SharePoint | Setting up projects, wikis, etc. | Flexible, highly customizable | Complex, difficult to use |
| OneDrive | Personal cloud storage | Fully integrated into Windows | Tied to individual user |
SharePoint is a web-based application for sharing and editing documents. SharePoint is based around individual sites, which can contain different subsites and elements similar to a normal website, but with access limited to a pre-defined group of users. This can include members of your organization as well as external partners, contractors, freelancers or guests. Common use cases for SharePoint include internal wikis or knowledge hubs, the use as a company intranet or even SharePoint sites for specific projects, which allow employees from different departments to coordinate and share resources, timetables and documents in one location.
OneDrive provides 1 Terabyte of personal storage for every licensed user in your organization. OneDrive lets users access files regardless of which device they are currently on, as well as allowing them to share documents with others. On a technical level, OneDrive basically acts as a SharePoint site that only one person can access by default.
As a all-in-one communications platform, Microsoft Teams combines a chat feature with meetings and video calls as well as document sharing and embedding. Users can be part of multiple teams at once, such as a company-wide team for general updates and a smaller team for their specific department, allowing them to track tasks or discuss their progress.
The rule of assigning permissions in SharePoint
- Assign permissions to groups—never to users directly.
- Whenever you change the membership of a SharePoint group, the next time the search passes with an incremental crawl, it will launch a full crawl to recalculate the entire access control list. So only give permissions to SharePoint groups. And the members of the SharePoint groups should be Active Directory groups, not individual users. This is best practice. When you assign permissions, please follow the steps.
- Give permissions to SharePoint groups so your library gives rights to SharePoint groups.
- Inside of your SharePoint groups, add Active Directory groups.
- Then, add your users to an Active Directory group.
3. The best thing to do—as long as you can, for as far as you can—is to leave permission inheritance intact. If you have to break it, try to do so at the site level, if possible. If you’re going to break permission inheritance, try to do it at the document library or folder level.
4. there are a number of important differences between managing NTFS permissions on your file server and managing SharePoint permissions, including the different permission levels and the fact that SharePoint automatically deactivates inheritance when you set custom permissions.
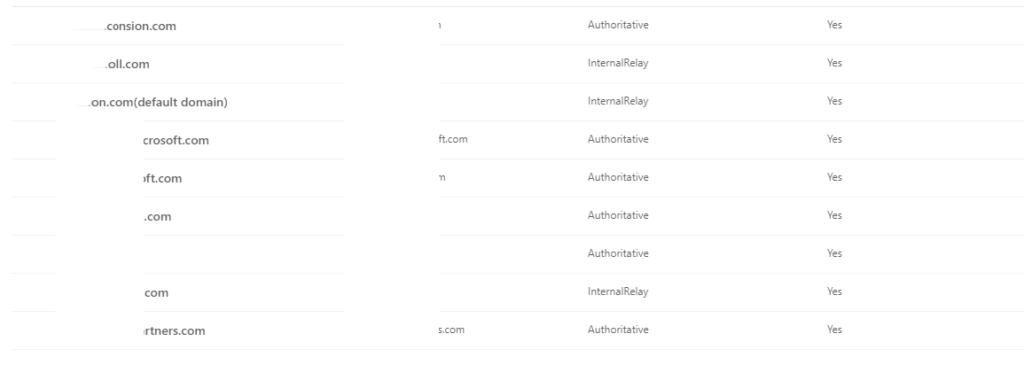
Authoritative vs Internal Relay Domains in Exchange
Q: When checking our Domain status, I see some are Authoritative domain and other are InternalRelay Domain. Why and what are different?
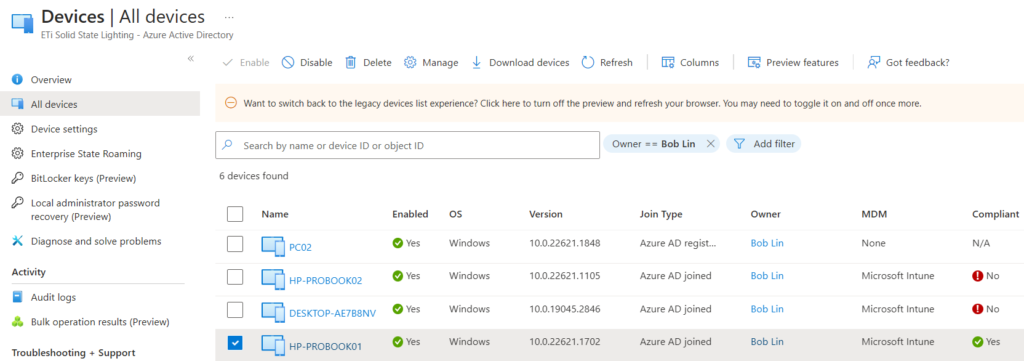
How to Remove Windows Device from Azure AD
Note 1: Please save your data before remove the AAD computer from Azure AD. Otherwsie, you may lose the data.
Note 2: Please remember your local administrator credentials or create a new local administrator account. Otherwise, you may have a problem to login.
Note 3: After you unregister the windows 10/11 device, you will lose device access to school or work resources.
A. Remove Windows Device from Azure AD
- Login to Windows with your organizational account.
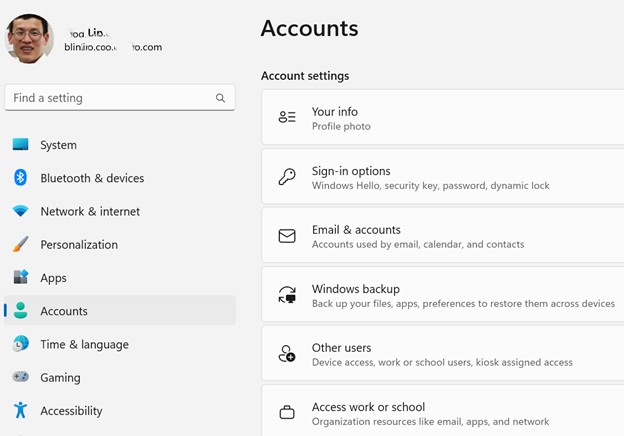
- Go to Start -> Settings.
- Select Accounts > Access work or school.
- Select the connected Azure AD domain account that you want to remove, and click Disconnect.
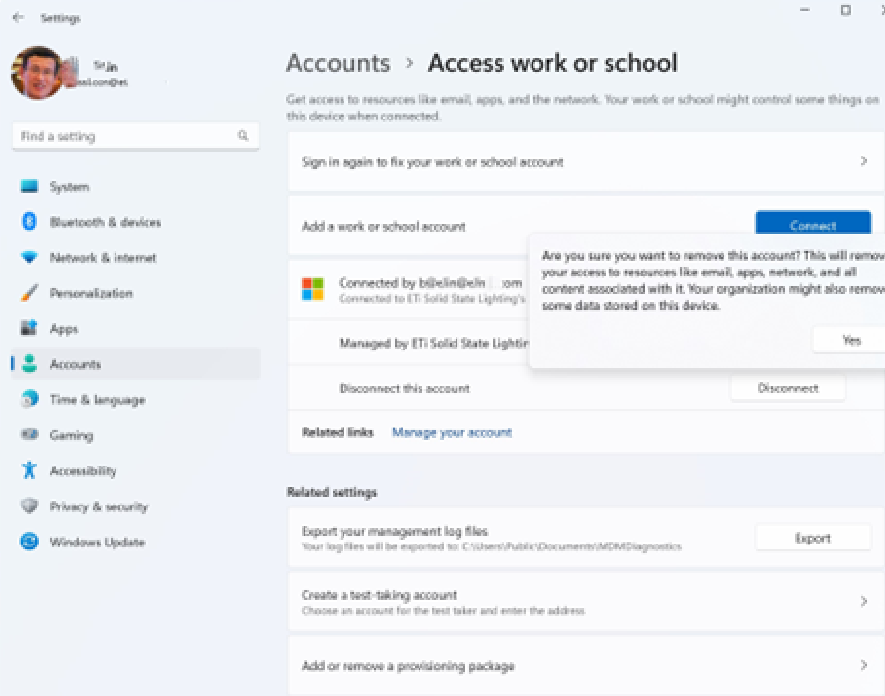
- Click Yes to confirm the removal of the account. This will remove your access to resources like email, apps, networks, and all content associated with it. Your organization might also remove some data stored on this device.
- Click on Disconnect, After disconnecting you won’t be able to sign in to this PC with your organization’s account.
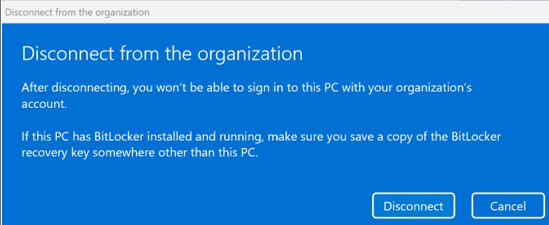
Note: If this PC has BitLocker installed and running, make sure you save a copy of the BitLocker recovery key somewhere other than this PC.
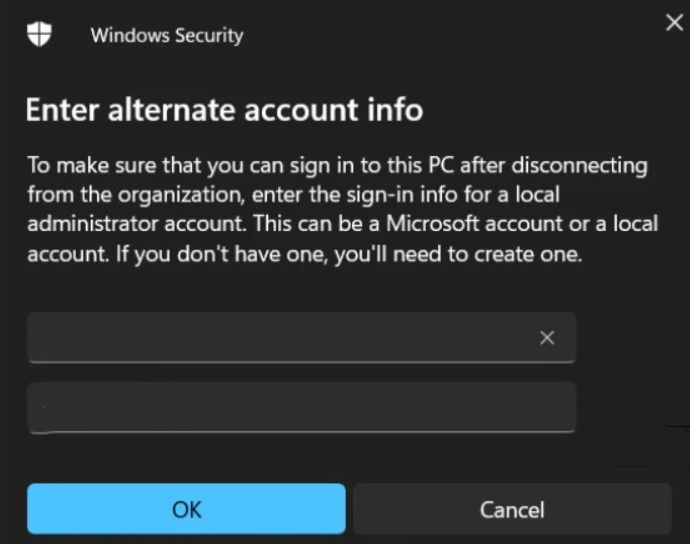
- Enter the sign-in info for a local administrator account. This can be a Microsoft account or a local account. Here Enter the username and password for an existing account, If you don’t have one, you will need to create a new account, click OK.
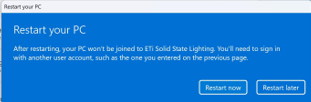
- Click on Restart now or Restart later to remove windows device from Azure AD join, After restarting, your PC won’t be joined to Azure AD. You will need to sign in with another user account.
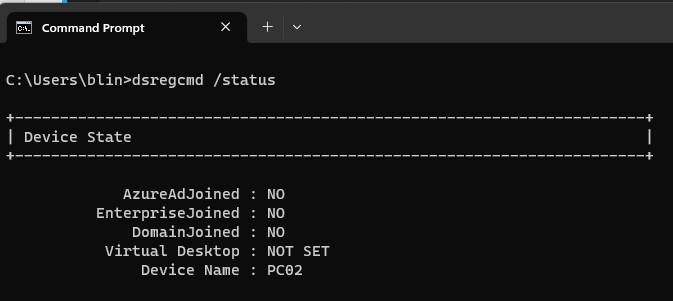
- Restart the computer and login. To validate the Join Status, run this command; dsregcmd /status
B. Remove Windows Device from Azure AD using Azure Intune
- Sign In to Azure Portal https://portal.azure.com/.
- Navigate to the Azure AD, Select the device from the list which you want to remove.
- Click Delete con on the top to remove it.
C. Remove Windows Device from Azure AD using Command Line
- Reseat steps on B and click on the device to copy the device’s Object ID

- You can use the Azure Active Directory PowerShell module, To Install Azure AD Module, Type the following command in PowerShell.
Install-Module AzureAD- You will be prompted to confirm the installation and import of the NuGet provider. Enter Y in all confirmation dialogs. The package installation will take a few minutes, wait for the installation to finish, then close the PowerShell window.
- Type the Connect-AzureAD cmdlet to connect an authenticated account to use for Azure Active Directory cmdlet requests. You can use this authenticated account only with Azure Active Directory cmdlets.
- Once you connected,
Type the Remove-AzureADDevice cmdlet to remove a device from Azure Active Directory (AD). This command removes the specified windows device from Azure AD Join.
Remove-AzureADDevice -ObjectId "1c913ae1-ea7f-4589-8b42-b2140a13c304"

-ObjectId
Specifies the object ID of a device in Azure AD.
-Remove-AzureADDevice
Remove Windows device from Azure AD Join. How To Remove Windows 11 From Azure AD
. Right click Start Button or press + X keys and select Settings.
2. In the Settings app, navigate to Accounts > Access work or school.
3. In right pane corresponding to Access work or school, click on your currently connected to Azure AD account and then click Disconnect.
4. Now click on Yes, when the confirmation prompt appears.
5. Then you’ll Disconnect from the organization box, after reviewing the information provided, click Disconnect.
6. Next, you need to enter the existing local or Microsoft account information. You can here simply type your local user account name and its password, like we did.
7. If your account info provided is correct, you’re asked to make a final restart to disconnect from Azure AD. Simply click on Restart now to finish the process.
8. After reboot, your system will no longer be connected to your Azure AD account.
How to change the account email address in Windows 11
To change the account email address in Windows 11, you can follow these steps:
- Open the Start menu by clicking on the Windows icon in the taskbar or pressing the Windows key on your keyboard.
- Click on your user profile picture or account name located at the top right corner of the Start menu.
- In the drop-down menu, select “Settings” to open the Windows Settings app.
- In the Settings app, click on the “Accounts” category.
- In the left sidebar, select “Your info.”
- On the right side, under the “Account info” section, you will see your current email address listed. Click on the “Manage my Microsoft account” link below it.
- This will open a browser window and take you to the Microsoft account website. You may be prompted to sign in again for security purposes.
- Once you’re signed in, navigate to the “Your info” section of your Microsoft account.
- Look for the “Manage how you sign in to Microsoft” option or a similar setting related to account email addresses.
- From there, you should have the option to add or change your email address associated with your Microsoft account. Follow the on-screen instructions to complete the process.
Note: The steps above assume you already have a Microsoft account linked to your Windows 11 user account. If you don’t have a Microsoft account yet or want to create a new one, you can do so from the Microsoft account website or during the initial setup of Windows 11.Regenerate response
What’s Authenticate an IMAP, POP or SMTP connection using OAuth?
Authenticating an IMAP (Internet Message Access Protocol), POP (Post Office Protocol), or SMTP (Simple Mail Transfer Protocol) connection using OAuth involves using OAuth tokens to verify the identity and authorization of the client accessing the email server. OAuth is an open standard protocol that allows users to grant limited access to their resources (such as email) to third-party applications without sharing their passwords.
Here’s a general overview of the process for authenticating an IMAP, POP, or SMTP connection using OAuth:
- Register the application: The first step is to register your application with the email service provider (e.g., Gmail, Microsoft Outlook) to obtain the necessary credentials (client ID and client secret) for OAuth authentication.
- Obtain authorization: When a user wants to grant access to their email account, your application initiates the OAuth authorization flow. This typically involves redirecting the user to the email service provider’s authorization endpoint with the necessary parameters, including the requested scope (e.g., read, write, send email).
- User consent: The email service provider presents the user with a consent screen, explaining the permissions your application is requesting. The user can review the permissions and decide whether to grant access to your application or not.
- Token exchange: If the user grants access, the email service provider generates an authorization code and redirects the user back to your application’s specified redirect URL. Your application then exchanges this authorization code for an access token and a refresh token by making a request to the email service provider’s token endpoint, along with the client credentials (client ID and client secret).
- Store tokens securely: Once your application receives the access token and refresh token, it should securely store them for future use. The access token is used to authenticate the client during each API request, while the refresh token can be used to obtain a new access token when the current one expires.
- Authenticating the connection: To authenticate the IMAP, POP, or SMTP connection, you need to include the access token in the respective protocol’s authentication mechanism. Typically, this involves adding the access token as part of the authentication headers or passing it as a parameter during the connection establishment.
- Token expiration and refreshing: Access tokens have an expiration time, after which they become invalid. To ensure continuous access, your application needs to handle token expiration and use the refresh token to obtain a new access token when needed. This can be done by making a request to the email service provider’s token endpoint with the refresh token to obtain a fresh access token.
By following this process, your application can securely authenticate IMAP, POP, or SMTP connections using OAuth, allowing users to authorize access to their email accounts without exposing their passwords to third-party applications.
How to use Kaseya to push an Application
- Access the Kaseya Console: Log in to the Kaseya Console using your administrator credentials. This is the web-based interface where you can manage your endpoints and perform various tasks.
- Create an Application Package: In Kaseya, you need to create an application package before you can push it to your endpoints. To do this, navigate to the Agent Procedure>Installer Wizards>Application Deploy.
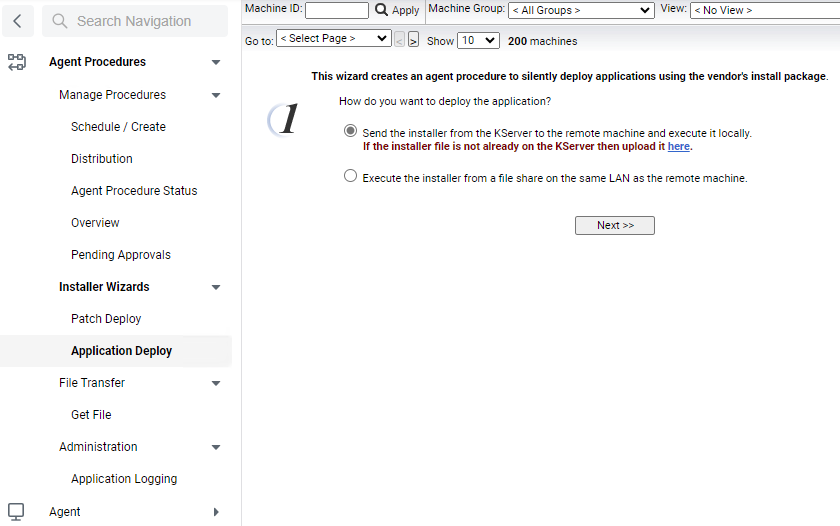
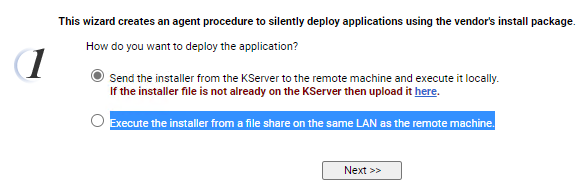
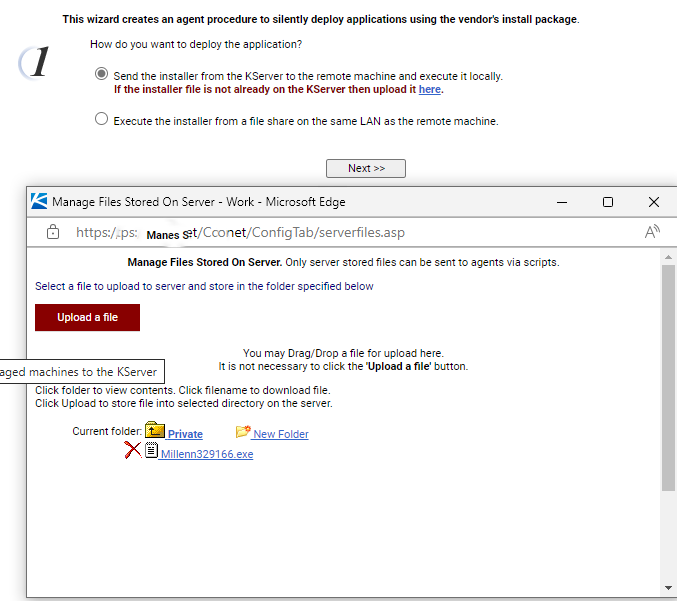
You have two options to deploy silently push, Send the installer from the KServer to the remote machine and execute it locally and Execute the installer from a file share on the same LAN as the remote machine.
In our example, we Send the installer from the KServer to the remote machine and execute it locally by adding the installer file.
Click on Private files.
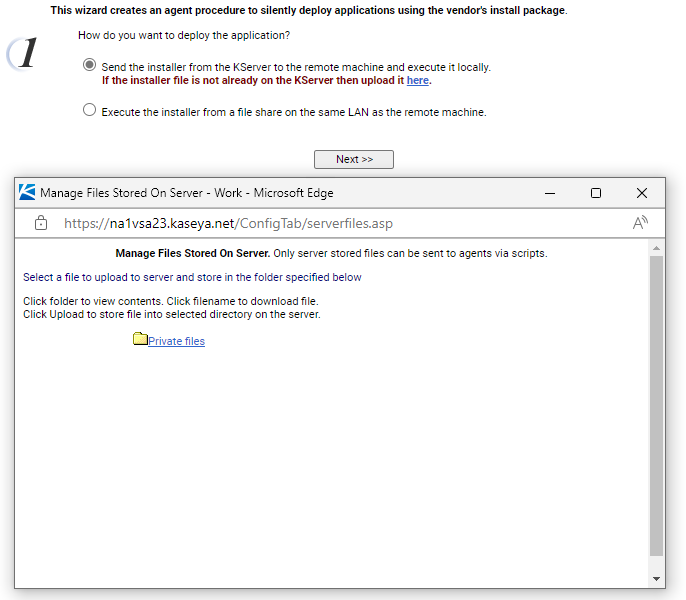
Click on Upload a file.
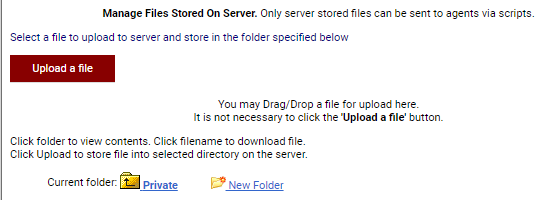
Close the Upload file page and click Next.
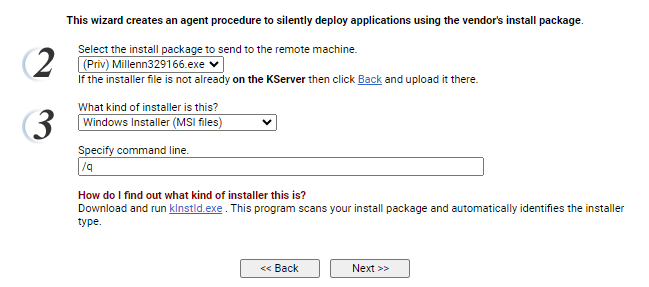
Select the install package to send to the remote machine and installer type.
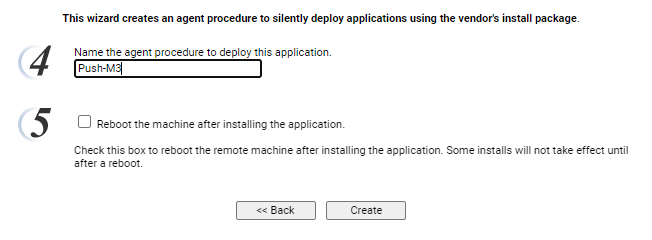
Name the agent procedure to deploy this application and the click on Create.
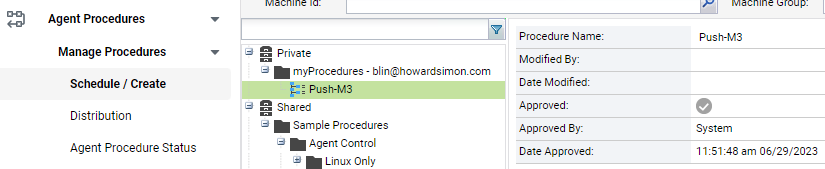
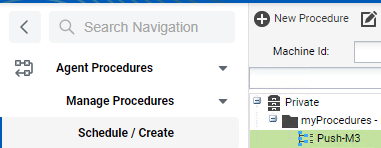
3. Customize Deployment Options: Configure additional deployment options, such as scheduling the deployment for a specific time, specifying the target endpoints or groups, and determining the deployment method (e.g., push installation or self-service portal). Navigate to Agent Procedures>Manage Procedures>Schedule / Create>Private>myProcesdure and click on the application package you just created.
Under Schedule, select the computers you want to install the application.
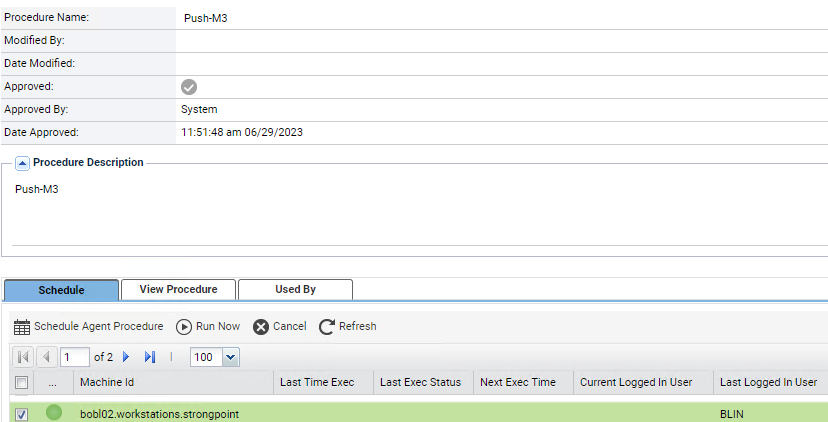
You have options to Schedule Agent Procedure or Run Now.
If you choose Schedule Agent Procedure, select running date and time. Then Submit.
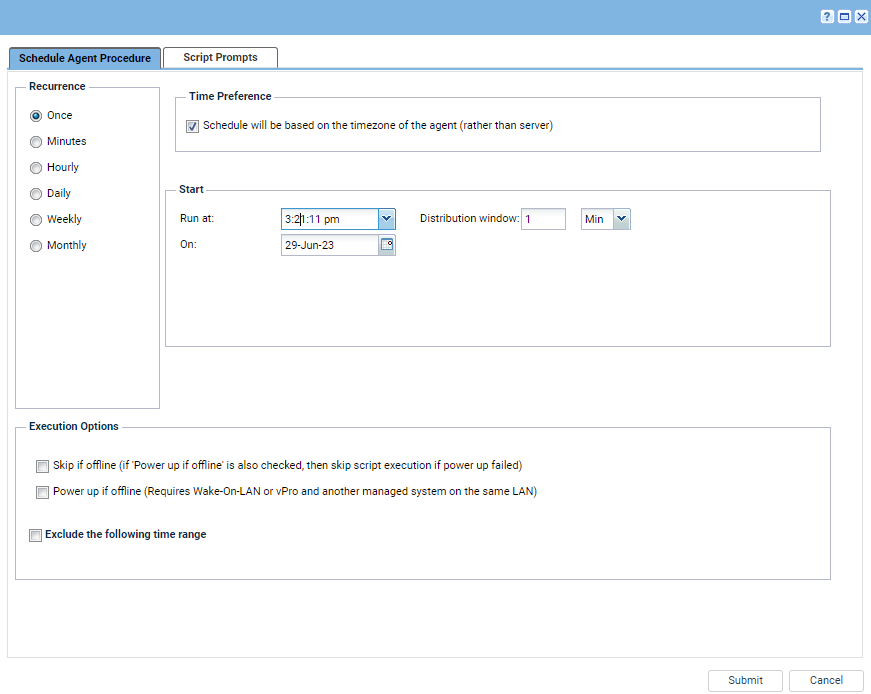
Click Yes to confirm it.
Review and Test: Review all the settings and configurations for the application package. It’s advisable to test the deployment on a small group of test endpoints before rolling it out to a larger number of devices.
Deploy the Application: Once you are satisfied with the configuration, initiate the deployment of the application package. Kaseya will push the application to the specified endpoints based on your defined settings.
Monitor and Troubleshoot: Monitor the deployment progress within Kaseya to ensure the application is being installed successfully on the target endpoints. If any issues arise, use the built-in troubleshooting features of Kaseya or consult the application’s documentation for guidance.
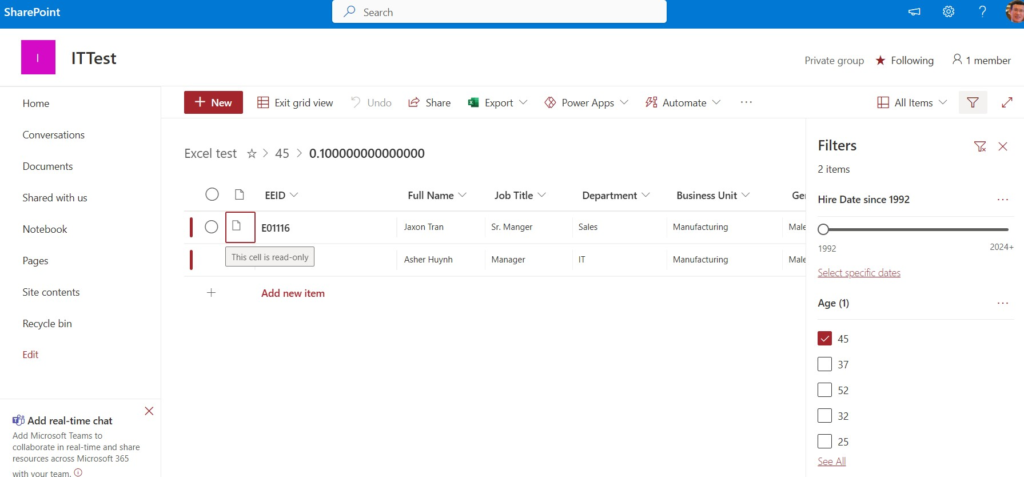
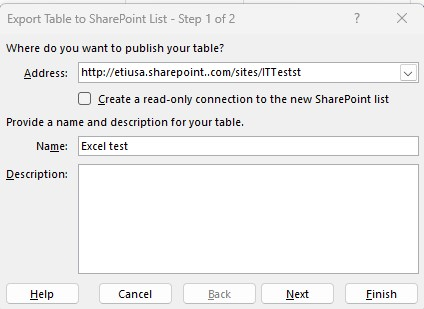
How to export Excel to SharePoint
You may be able to copy the Excel table to SharePoint. However, the best way to do is exporting excel to SharePoint. Here is how.
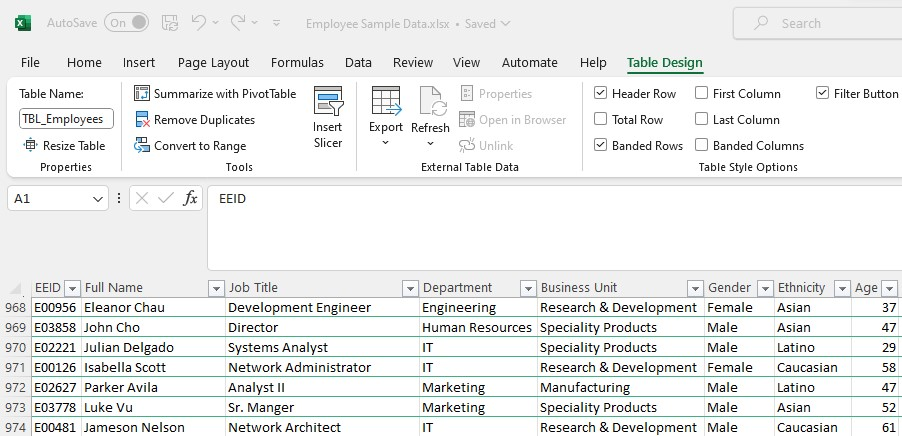
- With Excel spreadsheet open, select the data range and Format it as a Table
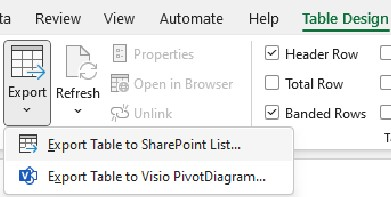
2. Click on Table Design and then click on Export
3. Select Export Table to SharePoint list.
4. Enter the Address and Name.
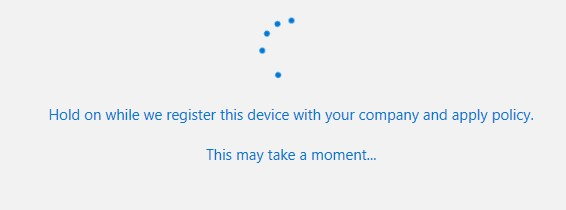
5. Sign in Office 365.

6. It may take a few seconds.
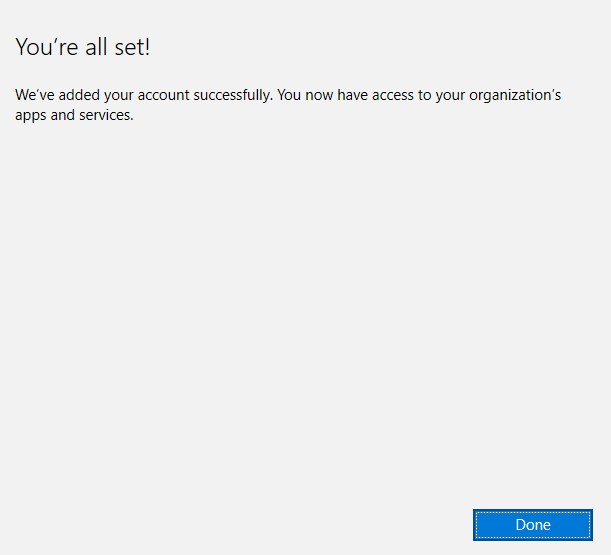
7. Click Done when You’re all set!
8. If it successful, click OK.
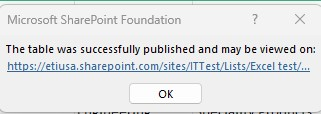
9. Go to the address to check the Excel on SharePoint.
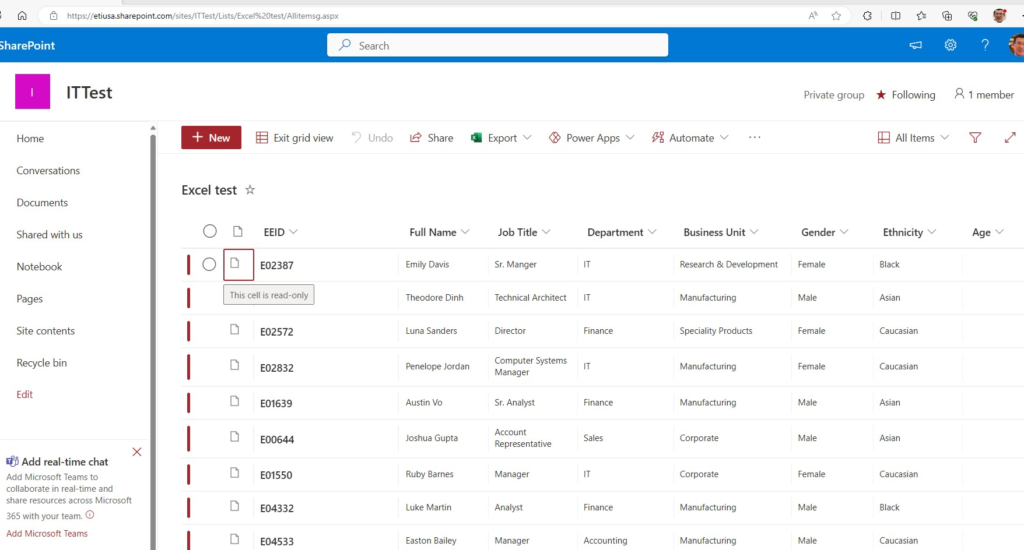
10. With imported excel, you can Filter and see what you want to see.