How to reset default view in outlook?

Please try this and let me know the result.

 To reset the view in Outlook to its default settings, follow these steps:

  1. Open Outlook on your computer.
  2. In the Outlook ribbon, switch to the “View” tab.
  3. Click the “Reset View” button.
  4. Confirm by selecting “Yes” in the confirmation window.

Your Outlook view will now be set to the default. If you’re still not satisfied with the view, you can also try the following options:

Click “Change View” in the same “View” tab and choose from three options: “Compact,” “Single,” or “Preview.”

Additionally, if you encounter any issues, you can reset the view using a command in Windows’ Run dialog box. Type the following command and press Enter:

outlook.exe /cleanviews

This will launch Outlook with the default view. If the problem persists, consider launching Outlook in safe mode to troubleshoot add-ins that might be causing the issue.

How to use text-to-speech in OneNote

  1. Download and install OneNote from Microsoft store or Microsoft 365.

2. With the OneNote open, post the text you want to convert to speech.

3. Click on View.

4. Click on Immersive Reader.

5. With the Immersive Reader open, you have option to setup Voice to select speed and voice.

6. Click Play icon to read the texts.

How to check Gmail storage

Each Google account has 15GB of free storage for documents, photos, and Gmail messages. to check your google account storage, click on Settings icon on the top right.

Then Settings.

You will see the storage.

Click View items taking up storage t view the details.

Click Clean up space to free more spaces.

you Clean up by service.

How to generate QR code in Geovision GV-VMS?

To generate a QR code in GeoVision GV-VMS (Video Management System), you can follow these steps:

  1. Open GeoVision GV-VMS Software: Launch the GeoVision GV-VMS software on your computer. Ensure you have the necessary permissions and access rights to generate QR codes.
  2. Go to Toolbar>Network>Mobile Services.

3. Send this QR code to the users.

Merge Focus and Other in Outlook

To merge Focus and Other in Outlook, you need to Turn off Focused Inbox.

  1. Select the View tab.
  2. Select Show Focused Inbox.

The Focused and Other tabs will disappear from the top of your mailbox.

How to remove duplicate emails in outlook?

A. Email Remover App

Duplicate Email Remover Developer: MAPILab Platform: Microsoft Outlook (Windows) Features:

  1. Easy-to-Use Interface: The app provides a user-friendly interface that allows you to quickly identify and manage duplicate emails.
  2. Customizable Settings: You can customize the scanning criteria to suit your specific needs, such as searching within specific folders or applying filters based on email attributes.
  3. Automatic Removal: Once duplicates are identified, the app offers options for automatically removing them based on your preferences.
  4. Safe and Reliable: Duplicate Email Remover ensures the safety of your emails during the removal process, so you can trust that your important messages won’t be accidentally deleted.
  5. Time-Saving: By eliminating duplicate emails, you can streamline your Outlook inbox and save time when searching for important messages.

How to Use:

  1. Download and Install: Visit the MAPILab website or the Microsoft AppSource to download and install the Duplicate Email Remover add-in for Outlook.
  2. Launch Outlook: Open Microsoft Outlook and navigate to the Duplicate Email Remover add-in.
  3. Scan for Duplicates: Initiate a scan of your Outlook mailbox to identify duplicate emails.
  4. Review Results: Once the scan is complete, review the results to see the duplicate emails found.
  5. Remove Duplicates: Select the duplicate emails you want to remove and choose the appropriate action (e.g., delete, move to a different folder).

Note: Always ensure you have a backup of your emails before using any third-party tool for managing your mailbox.

Duplicate Email Remover by MAPILab is not entirely free. While it may offer a free trial period during which you can use its features, access to its full functionality typically requires purchasing a license or subscription.

Bitrecover Outlook Duplicate Remover.

  • Download the wizard to your software and start it.
  • Browse the PST file and open it in the software window.
  • Select the mailbox folder where you want to delete duplicate data.
  • Then select the PST file size and desired language.
  • Finally, set the location for the result data and then press “Extract” to get a quick output.

Other remover apps: REMOVE DUPLICATE MESSAGES,  Outlook duplicate finderFree Add-ins for Microsoft® Outlook,

B. Outlook Clean Up Tool

Outlook also offers an inbuilt function to remove duplicate emails in Outlook that we know as the Clean Up Tool. You need to follow the instructions as we have discussed below:

  • Open Outlook and select a mailbox folder.
  • Then click on “Home” and then “Cleanup”.
  • Clean Up Conversation deletes and removes duplicate emails from a specific folder.
  • The cleanup folder deletes duplicate emails from a specific folder.
  • “Clean Folder and Subfolders” removes the duplicate folder and subfolders.
  • You can opt any of them as per their comfort.
  • Then right-click on the deleted data and tap on the empty folder that will permanently delete duplicate emails from Outlook.

C. remove duplicated emails manaully

If you’re experiencing duplicate emails in your Outlook inbox, you can follow these steps to remove them from within Microsoft 365 Outlook:

  1. Open Outlook on your computer.
  2. Go to the “Mail” tab at the bottom left corner of the Outlook window.
  3. Select the folder where you have the duplicate emails (e.g., “Inbox”).
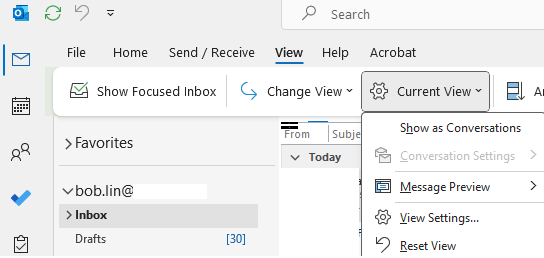
  4. Click on the “View” tab in the ribbon at the top of the window.
  5. In the “Current View” section, click on the “View Settings” button.
  6. The “Advanced View Settings” window will open. Click on the “Filter” button.
  7. In the “Filter” window, make sure the “More Choices” tab is selected.
  8. Check the box next to “Only items with” and select “Unique Subject and Body” from the dropdown menu.
  9. Click “OK” to close the “Filter” window.
  10. Back in the “Advanced View Settings” window, click on the “Columns” button.
  11. In the “Show Columns” window, select “All Mail fields” from the “Select available columns from” dropdown menu.
  12. From the available columns, find and select “Modified” and “Size (KB)” and click “Add” to move them to the “Show these columns in this order” section.
  13. Click “OK” to close the “Show Columns” window.
  14. Back in the “Advanced View Settings” window, click “OK” to apply the changes.
  15. You’ll be back in the main Outlook window with the duplicate emails filtered out.
  16. Sort the emails by the “Modified” column by clicking on the column header. This will group the duplicates together.
  17. Review the grouped duplicates and select the ones you want to delete.
  18. Right-click on the selected duplicate emails and choose “Delete” from the context menu.
  19. Confirm the deletion when prompted.

What is Microsoft PC Manager 

What is Microsoft PC Manager ?

Quoted:

On Windows 11 (or 10), PC Manager is an app from the Microsoft Store designed to enhance the overall performance, security, and management of the operating system. 

It serves as a comprehensive tool that helps you maintain your computer’s health by providing a variety of functionalities to resolve high memory usage, free up space quickly, disable and terminate unnecessary processes, scan for malware, and more.

However, the PC Manager app doesn’t introduce anything innovative since virtually every feature is already available on Windows 11 (or 10). The app feels more like a combination of the Task Manager and Settings app with a bunch of shortcuts to features and other Microsoft tools.

How to Set up your password reset verification method (by user self)

  1. Open the web browser on your device and go to the Security info page.
  2. Depending on how your administrator has set up your organization, one or more of the following options will be available for you to set up as your security verification method. If multiple options are available, we strongly recommend that you use more than one as your security verification method, in case one of your methods becomes unavailable.
    1. Authentication app: Choose to use the Microsoft Authenticator app or other authenticator app as your security verification method. For more information about setting up the app, see Set up an authenticator app as your verification method.
    1. Text messaging: Choose to send yourself text messages to your mobile device. For more information about setting up text messaging, see Set up text messaging as your verification method.
    1. Phone calls: Choose to get a phone call to your registered phone number. For more information about setting up phone calls, see Set up a phone number as your verification method.
    1. Security key: Choose to use a Microsoft-compatible security key. For more information, see Set up a security key as your verification method.
    1. Email address: Choose to use an alternate email address that can be used without requiring your forgotten or missing password. This only works for password reset, not as a security verification method. For more information about setting up an email address, see Set up an email address as your verification method.
    1. Security questions: Choose to set up and answer pre-defined security questions set up by your administrator. This only works for password reset, not as a security verification method. For more information about security questions, see Set up security questions as your verification method.

After you select and set up your methods, choose Finish to complete the process.

How to switch back to the classic view in Outlook

A. Switch between classic Outlook and New Outlook.

  1. Open Outlook.
  2. Navigate to the Outlook menu.
  3. Uncheck the option for the New Outlook.
  4. Click the Revert button.
  5. Allow the application to revert to the Outlook Classic view.

If you don’t see a toggle in the new Outlook for Windows, troubleshoot with these steps:

  1. Launch classic Outlook for Windows from the Windows Start Menu, not the new Outlook (identified by the “New” tag).
  2. Open the Registry Editor by typing “Registry Editor” in the Start Menu search and selecting the app.
  3. Go to Computer\HKEY_CURRENT_USER\Software\Microsoft\Office\16.0\Outlook\Preferences.
  4. Find and double-click on “UseNewOutlook” at the bottom of the list.
  5. Set the Value Data field to 0.
  6. Attempt to launch classic Outlook for Windows from the Windows Start Menu.

Or UNINSTALL THE NEW OUTLOOK APP

Step 1: Open the Start menu and click the gear-shaped icon to open the Settings app.

Step 2: Use the left pane to switch to the Apps tab and click on Installed apps.

Step 3: Scroll through the list or use the search bar at the top to locate Outlook (new) on the list. Click the three-dot menu icon next to it and select Uninstall.

Step 4: Select Uninstall again to confirm.